

Can’t figure out why your Apple AirTag is not connecting with your iPhone?
When it comes to tracking items, Apple AirTag is almost perfect. While it is a great tool, , it still has some issues to be resolved.
If you are here, it’s likely that you’re having problem pairing your AirTag to your iPhone.
Connecting your AirTag has prerequisites. It may not work properly if some features on your iPhone are disabled.
To help you out, we’ll show you a few techniques to fix your Apple AirTag if it’s not connecting with your iPhone.
Let’s jump right in!
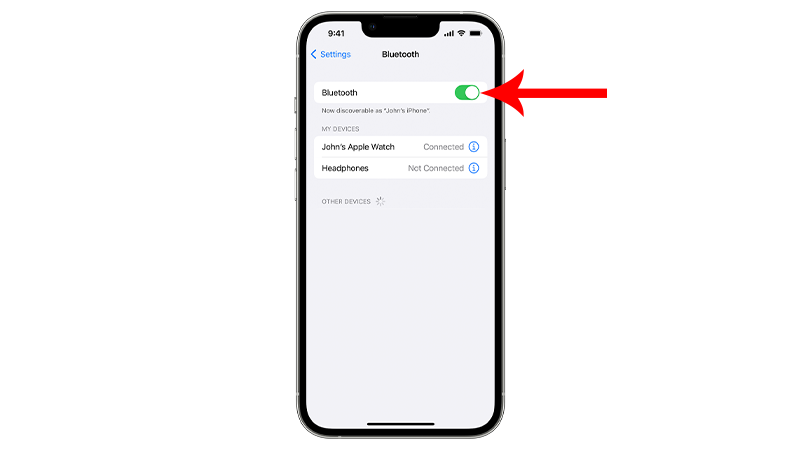
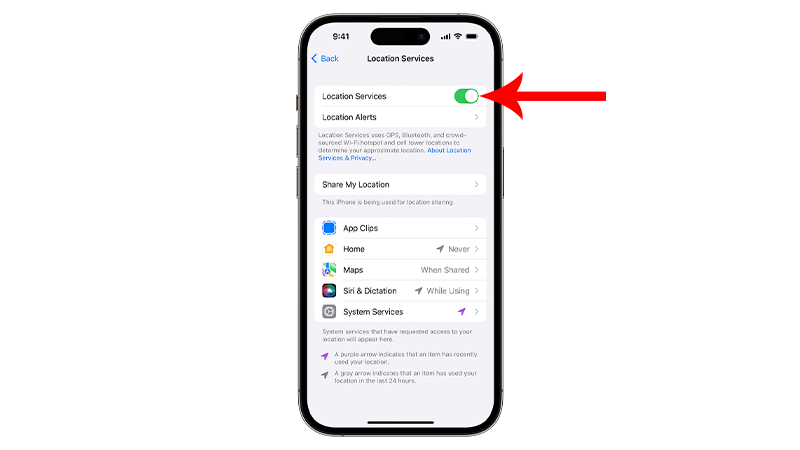
1. Enable Bluetooth and Location Services.
AirTag relies on Bluetooth and location services. If these options are disabled on your iPhone, you won’t be able to pair your AirTag.
Check out the steps below to ensure Bluetooth and location services are enabled on your phone:
- Launch Settings on your iPhone.
- Tap on Bluetooth and make sure that it is enabled.
- Go back to the previous page.
- Scroll down and tap on Privacy.
- Access the Location Services tab.
- Tap the toggle switch beside Location Services to enable it.
Once done, try pairing your AirTag again to check if the problem is solved.
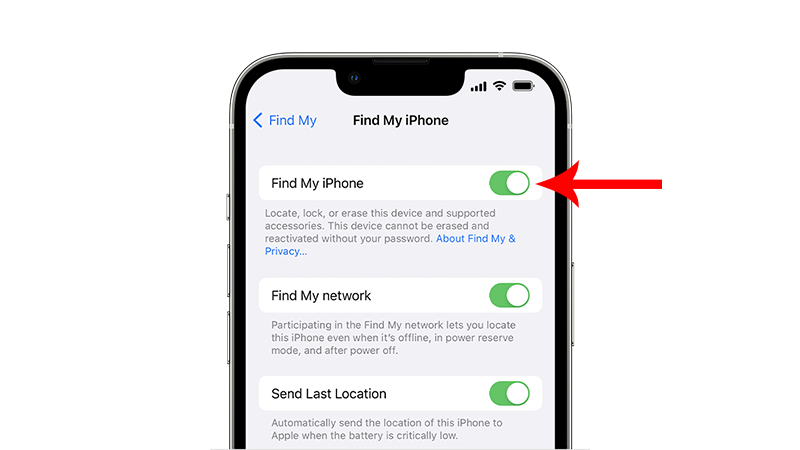
2. Enable Find My.
Another feature that is required to use AirTag is Find My. While Find My is enabled by default, try checking it to be sure.
See the steps below to enable Find My on your iPhone:
- Open Settings on your iPhone.
- Now, tap on your account name.
- Access the Find My tab.
- Check if the toggle switch beside Find My iPhone is enabled.
Note
You’ll see a green indicator on the toggle switch once Find My iPhone is enabled.
Pair your Apple AirTag afterward to check if the problem is solved.
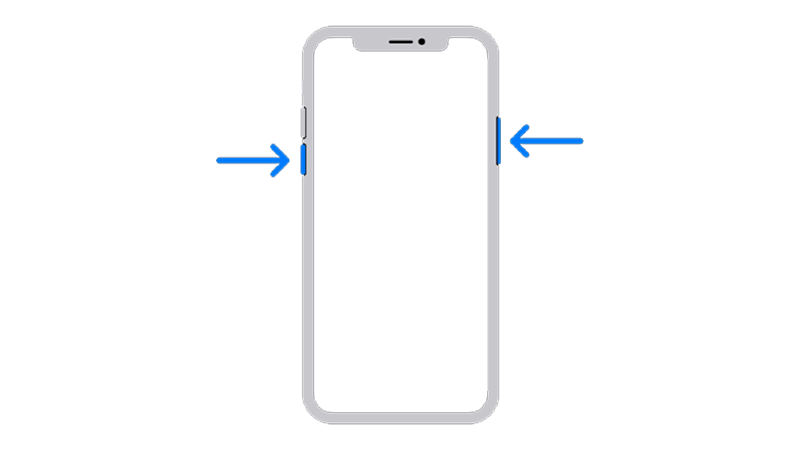
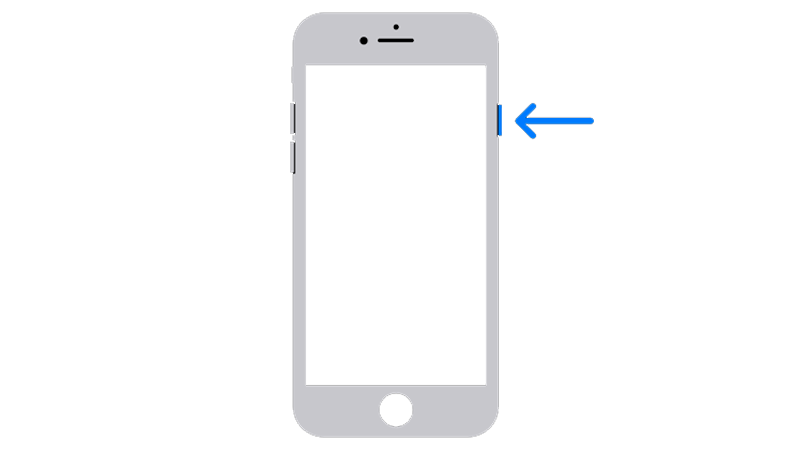
3. Restart Your iPhone.
If you still can’t connect your AirTag, we suggest restarting your iPhone.
Restarting your iPhone will ensure that your system resources are initialized properly. It will also clear corrupted data from the system memory, resolving any temporary issues in the process.
If you are using an iPhone X, 11, 12, 13, 14, or later, here’s what you need to do:
- Hold down the Volume Down button and Side button until the ‘Slide to Power Off’ prompt appears.
- Now, drag the slider to the right and wait for 30 seconds.
- Press the Side button afterward to turn on your device.
For older models, follow the steps below:
- Locate the Power button on your device.
- Now, hold the button until the ‘Slide to Power Off’ prompt shows up.
- Drag the slider to the right and wait 30 seconds before turning on your device.
Try connecting your AirTag again to see if restarting your device helped.
4. Use Find My to Setup AirTag.
If the AirTag window is not appearing on your iPhone, you can set it up manually using Find My.
Check out the steps below to guide you through the process:
- Open the Find My app on your iPhone.
- Now, access the Items tab in the bottom navigation bar.
- After that, tap on Add Item and select Add AirTag.
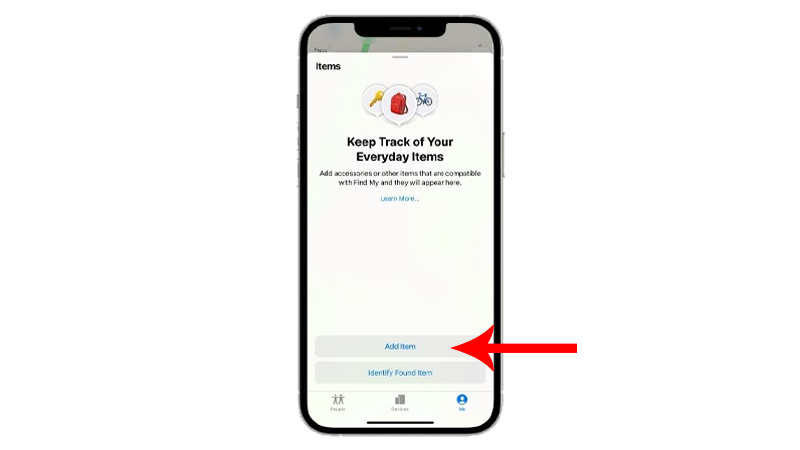
- Bring your AirTag close to your iPhone and follow the prompts when it gets detected.
Proceed to the next solution if you still can’t pair your AirTag to your iPhone.
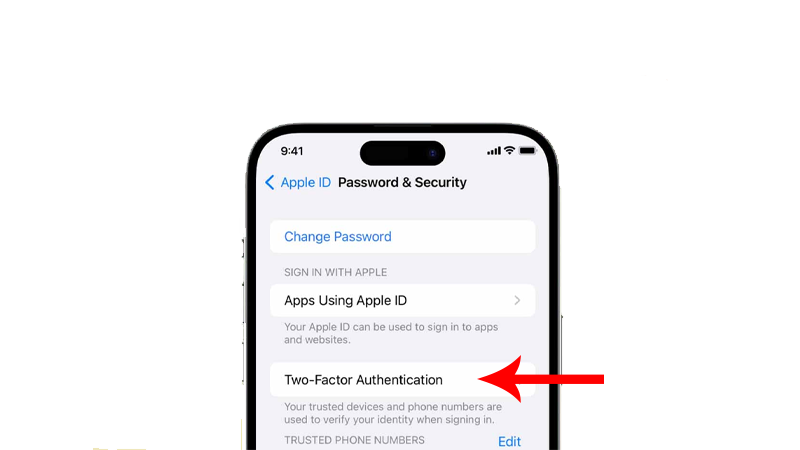
5. Enable 2FA.
As it turns out, Apple requires users to set up two-factor authentication before using AirTag services on their devices.
If you haven’t set up 2FA on your device, follow the guide below:
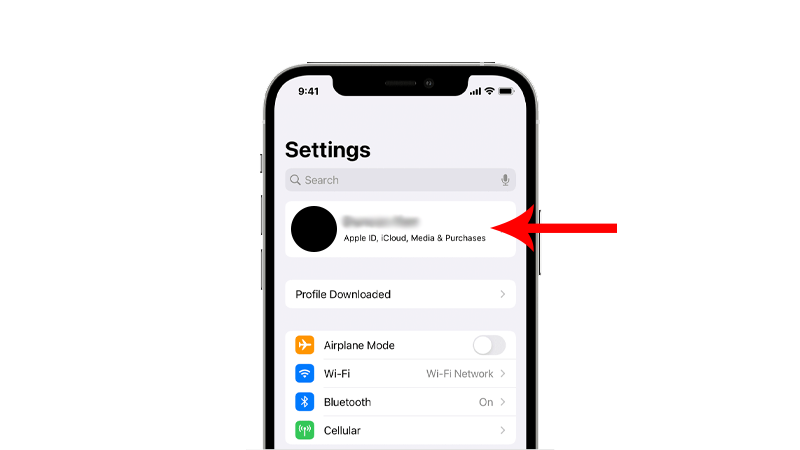
- Go to your iPhone’s Settings.
- Next, tap on your Profile.
- Go to Password & Security.
- Tap on Two-Factor Authentication.
- Now, tap Continue.
- Choose your country, add your phone number, and select a mode of verification.
- Tap Next to proceed. You will receive a text or call with your six-digit verification code.
- Enter your verification code and follow the prompts to complete the process.
Once done, try pairing your AirTag to check if the problem is solved.
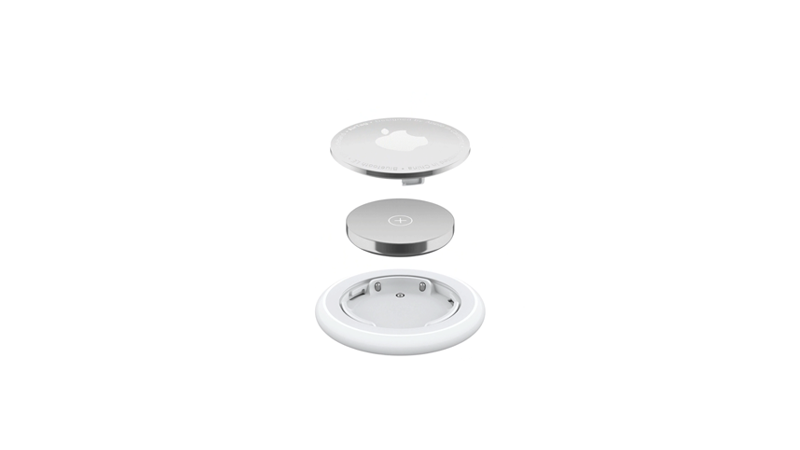
6. Replace AirTag Battery.
Your AirTag won’t work if it doesn’t have enough power. If you’ve been using your AirTags for a few months, we recommend replacing the batter.
AirTags has a battery life of less than 12 months, and can fail earlier depending on usage.
Here’s how you can change your AirTag’s battery:
- Press down on the polished steel battery cover of your AirTag.
- Now, rotate the cover counterclockwise until it stops spinning.
- Remove the cover, and you’ll see the CR2032 lithium battery.
- Change the battery and put back the cover by turning it clockwise until it clicks.
Try pairing your AirTag afterward to check if the problem is solved.
7. Reset Network Settings.
Resetting your network settings can also help resolve pairing issues with your AirTag.
This should roll back any changes in your network configurations that could be preventing your AirTag from connecting.
See the steps below to reset your network settings:
- On your iPhone, go to the main menu and open Settings.
- Now, tap on General.
- Look for Transfer or Reset iPhone and tap on it.
- Tap the Reset option and select Reset Network Settings.
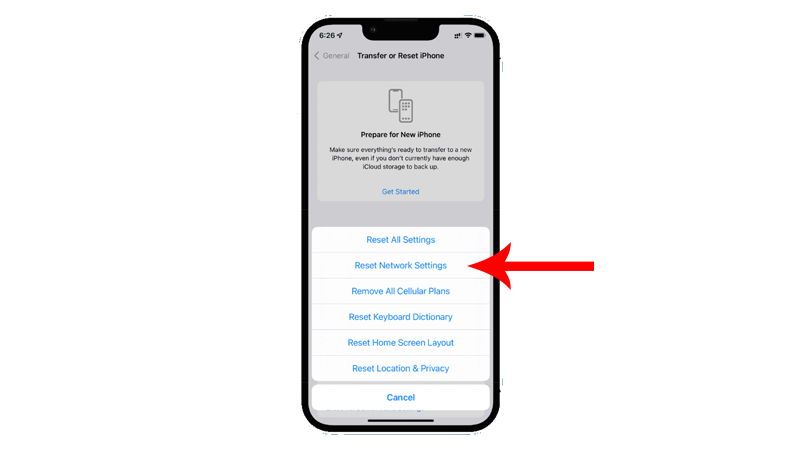
- Follow the prompts to continue.
Note
- Your iPhone will immediately restart upon resetting your network configurations.
- It may appear to be stuck in the Apple logo. Wait for the process to complete, which usually takes around 5 to 10 minutes.
Pair your AirTag again to see if it will connect successfully.
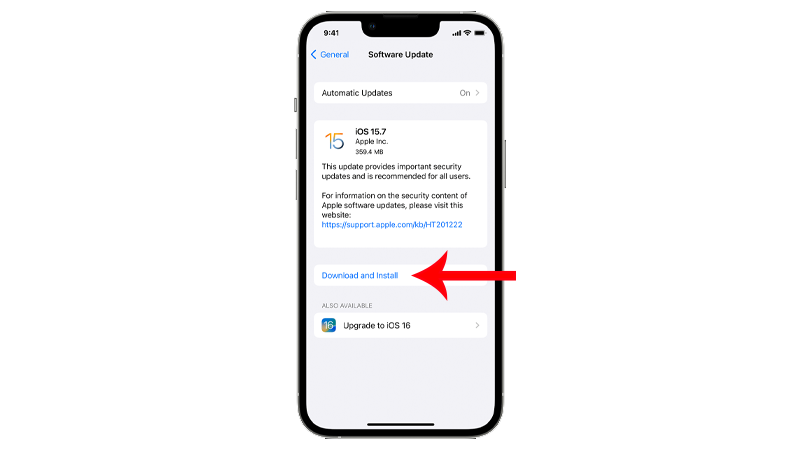
8. Update Your iPhone.
Outdated versions of iOS have underlying issues that can cause certain features to malfunction.
If you haven’t updated your phone, we suggest doing so to patch potential bugs or glitches in your system.
See the guide below to update your phone:
- Launch Settings on your device.
- Now, tap on General > Software Update.
- If there’s an available update, tap on Download and Install.
Note
- Your device can restart several times while installing the update.
- Make sure that your iPhone has at least 50% battery before installing updates. It’s best to keep your device plugged into the wall charger to avoid interruptions.
- Allow at least 15 minutes for the update to install, especially if it’s a major update (iOS 14 to iOS 15).
Try pairing your AirTag again to check if the problem is solved.
9. Visit the Apple Store.
If you just bought your AirTag, we suggest bringing it to the nearest Apple Store.
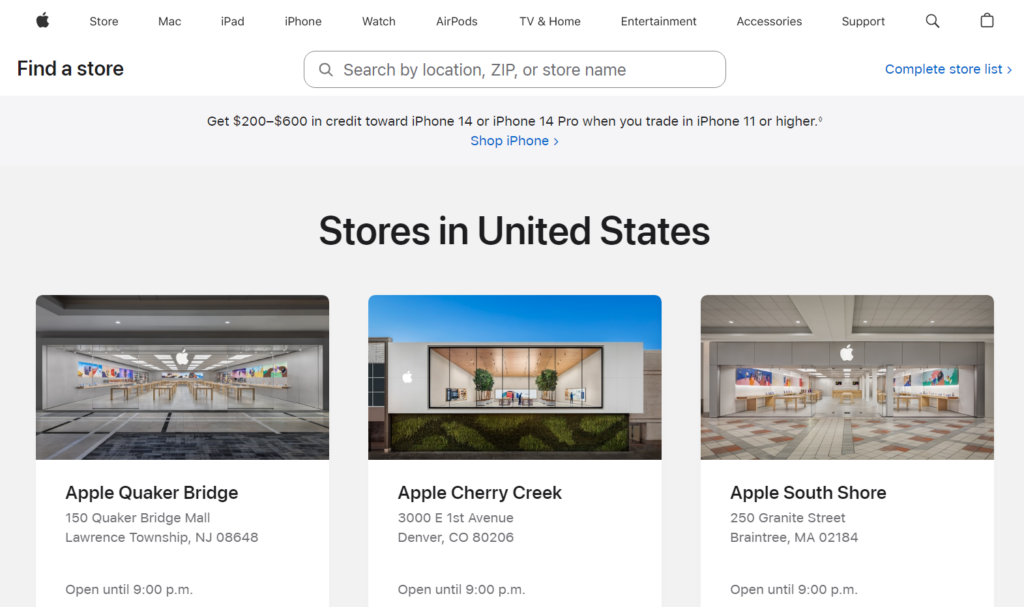
Have your device inspected by an authorized professional to know what’s going on. The AirTag you’ve purchased could be faulty. Apple might offer to fix it or provide you with a replacement if you have had it for less than 14 days.
That ends our guide for fixing your AirTag if it’s not connecting with your iPhone. If you have other concerns, voice them out in the comment section, and we’ll do our best to help.
